Random Geography Links – August 2019

Some great geography stories I just came across today:

21st Century Datacenter Locations Driven by 19th Century Politics – How the transcontinental railroad lead to Data Centers a hundred and fifty odd years later.

Cartographers of North Korea – who creates OpenStreetMap data for North Korea?

Mapmaker: The Gerrymandering game that puts the fun in undermining democracy – A board game based around Gerrymandering.

How a Gerrymander Nearly Cost Us the Bill of Rights – James Madison wanted to join Congress so he could amend the new Constitution. Patrick Henry was determined to stop him. By Richard Labunski

3d printed speaker enclosure in OpenSCAD

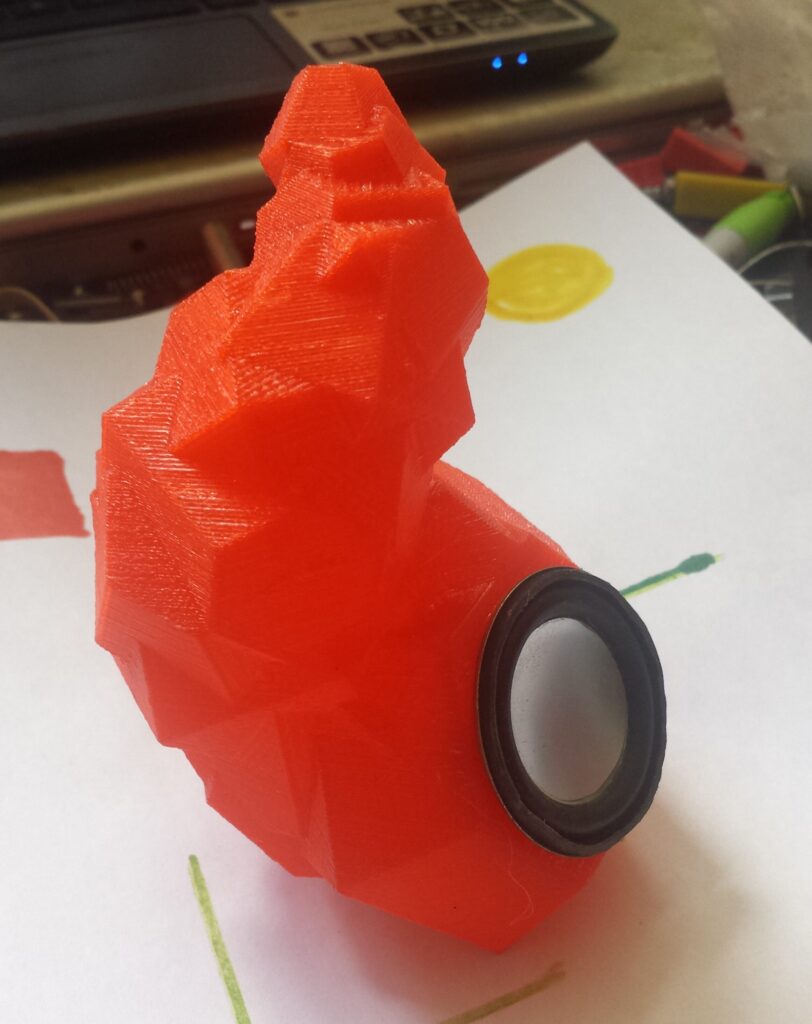
I designed this a few years ago just having fun with OpenSCAD. I had a small speaker that I needed a small enclosure for, and I wanted to test my new 3d printer at the time as well. So I came up with this design.

small 3d printed speaker enclosure

And the OpenSCAD Code:

//weird ass speaker cabinet for ~1.5 inch speaker. sgn June 2017

$fn = 6;
translate([0,0,102]){
rotate([195.57939, 29.244305, 54.377626]){ //puts it so base is flat, used repetier "lay flat" to find these numbers.
difference(){

snakey();

snakey2();

//SPEAKER hole
translate([5,22.5,75.75]) //translate([-1,26,75])
rotate([0,100,150])
cylinder(d = 36, h = 19, $fn = 32);

//flat face
translate([-5,28,75])
rotate([0,100,150])
cylinder(d = 57, h = 17, $fn = 32);

//"bottom" hole (for sphere at 0,0,0)
translate([0,0,-12])
cylinder(d = 6, h = 6);

//TEST CUBE
//translate([0,0,40])
//cube([100,100,20], center = true);

}

//BAD SIMPLE SPEAKER MODEL
//translate([-1,26,75])
//rotate([0,100,150])
//cylinder(d = 36, h = 10, $fn = 32);

difference(){
//FILL THE FACE
translate([-2.555,26.8,74]) //translate([-1,26,75])
rotate([0,100,150])
cylinder(d = 48, h = 2.5);

//SPEAKER hole
translate([5,22.5,75.75]) //translate([-1,26,75])
rotate([0,100,150])
cylinder(d = 36, h = 19, $fn = 32);

}

//fill small hole near speaker
//FILL THE FACE
translate([-2.5,20.5,53]) //translate([-1,26,75])
rotate([0,100,150])
cylinder(d = 5, h = 2.0);

}
}

module snakey(){

for( i = [0:11]){
translate([0,0,i
7]) rotate([0,i40,i30]) translate([0,i2,0])
sphere((i+5)*2.2);

}
}

module snakey2(){

for( i = [0:11]){
translate([0,0,i
7]) rotate([0,i40,i30]) translate([0,i2,0])
sphere((i+4.2)*2.2);

}
}

Better Leatherman Wingman Knife

I use a Leatherman Wingman all the time. I think I paid $20 for it, which means it’s cheap enough (made in China of course) that I don’t care if I break it. The one aspect I really don’t like is the (supposedly) 420a Stainless Knife blade. It doesn’t hold an edge at all, and is frankly almost useless sometimes.

So I grabbed some A2 scrap tool steel and started grinding away to make a newer knife blade. A2 isn’t the typical knife steel, but it’s tough, fairly easy to heat treat (the A stands for air quenching) and it’s got to be better than the “420” steel of the wingman.

Testing the fit of the new blade. I made it wider, as well as a larger thumbhole.
Test fit, obviously blade has yet to be finished/given an edge. Changed the shape of the blade to more of a modified drop point, but the shape is still unfinished.
A blurry picture that shows that the leatherman still works in the open position with the wider blade. But just barely.

The Bones of the DonkeyCar

So I’ve always thought that AI racing cars would be a blast to watch. I stumbled upon this website a while back which introduced me to DonkeyCars. And so since I already had a bunch of RC stuff and a few Raspberry Pi’s, I jumped in feet first.

To start with, I grabbed an inexpensive RC Car from Banggood. The HS 18311 (awesome name. But also known as the “Extreme Thunder”) At $40 when I bought it, it seemed like a decent deal, especially since I haven’t had an RC Car in years and years.

The car itself is pretty quick, and actually quite fun to drive. But as a base on which to create a new DonkeyCar, it’s got a few issues. First of all, it’s has the receiver, ESC (motor controller) and the electronics for the servo in all-in-one package. Great for creating a $40 rc car, bad for hobbyists.

The All-in-One ESC/Receiver/servo electronics along with the 5 wire servo and cut battery/motor wires.

The servo was a 5 wire servo, which I had never even knew existed. Apparently these are “dumb” servos, with all the electronics necessary to run them on the mainboard. So I grabbed a cheap 30amp brushed ESC from ebay, and an emax ES 3103E 17g servo.

The battery supplied was a 1200 maH 7.4v LiIon battery (two 18650’s) with a non-standard connector (I prefer JST for small batteries/machines, and XT60 for larger capacity or higher amperage uses) I replaced the lead to the battery with a JST, replaced the all-in-one board with the 30a ESC (which fit nicely where the tiny all-in-one board had been. The ES3103E was a direct replacement for the servo holder and the servo saver fit.

Finally, I used the Flysky FS-GT3B transmitter and receiver to hook it all together and it worked fine, while requiring no real changes/mods to the car (I used double sided tape to hold the receiver to the chassis.) This allowed me to test everything without the raspi first, just to make sure the mechanics work. Had to make a slight adjustment to the servo arm, but it worked and I had too much fun driving it.

One of the aspects of this design is that they have molded plastic covers for all of the electronics, even the motor. The Battery compartment can only be accessed from a door on the bottom of the chassis. It’s a nice looking design, and I think it may help to add to the durability of the car, but it makes getting to everything a bit of a pita. Further, the plastic center is attached to the plastic motor cover, which is also the motor holder. This is very subpar for a normal rc car (as it makes it difficult to change the size of motor, as well as providing better motor cooling.) However for our purposes, it’s fine.

But one of the aspects that I really like about this model, is the lack of a one piece canopy. Instead of a truck body, we’ve got a buggy/open cab design. This body has the plastic body with an internal roll cage structure. The seats/steering wheel interior is screwed to the roll cage, and easy to take out which gives us room for a raspberry pi.

Almost a perfect fit for a raspberry pi and case.

I have to make a slightly different case that will allow me to use the 4 screw holes in the roll cage to mount the raspi. But that shouldn’t be too difficult. And with the Pi mounted up near the top of the cab, you still have a decent amount of room to include other electronics and such in the bottom.

I also have to add, that someone has already made a donkeycar chassis adapter for this rc car. You can find it on thingiverse here: Donkey Car Chassis for RC Driver HAT

So next up, actually getting the raspi in there permanently, add the camera, MPU6050 and start getting the DonkeyCar going.