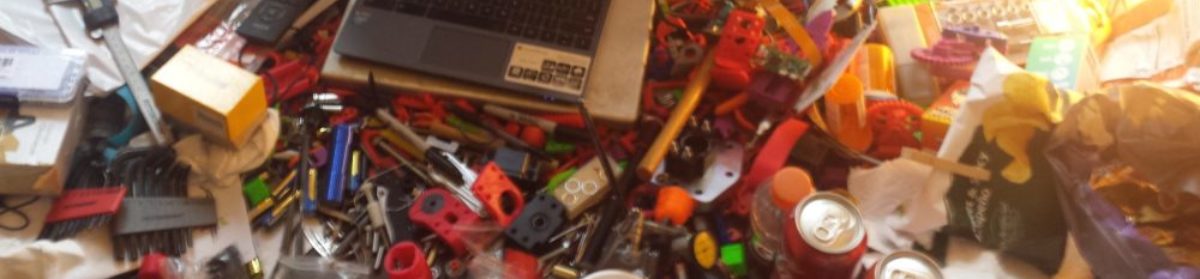
I use a Leatherman Wingman all the time. I think I paid $20 for it, which means it’s cheap enough (made in China of course) that I don’t care if I break it. The one aspect I really don’t like is the (supposedly) 420a Stainless Knife blade. It doesn’t hold an edge at all, and is frankly almost useless sometimes.
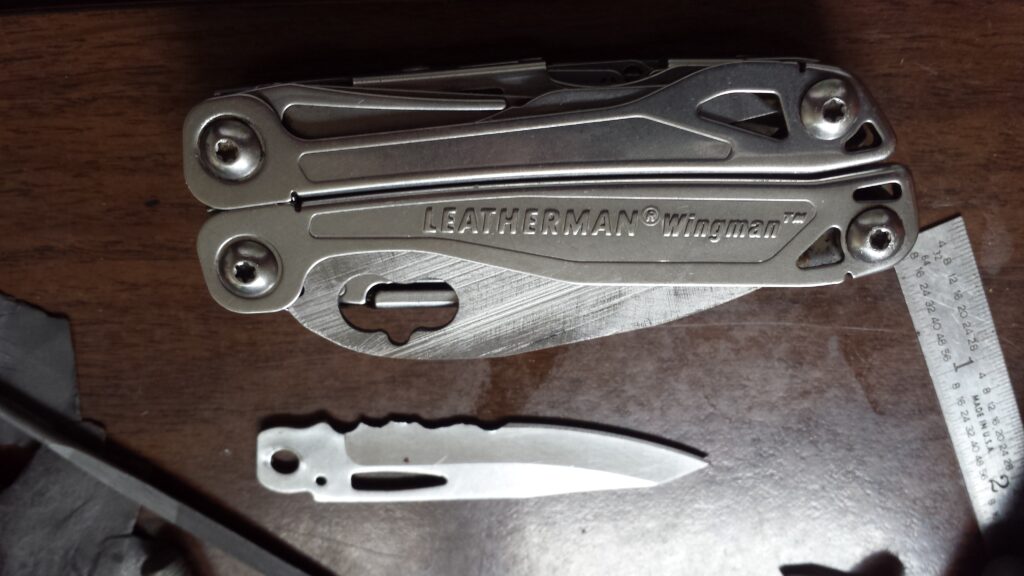
So I grabbed some A2 scrap tool steel and started grinding away to make a newer knife blade. A2 isn’t the typical knife steel, but it’s tough, fairly easy to heat treat (the A stands for air quenching) and it’s got to be better than the “420” steel of the wingman.
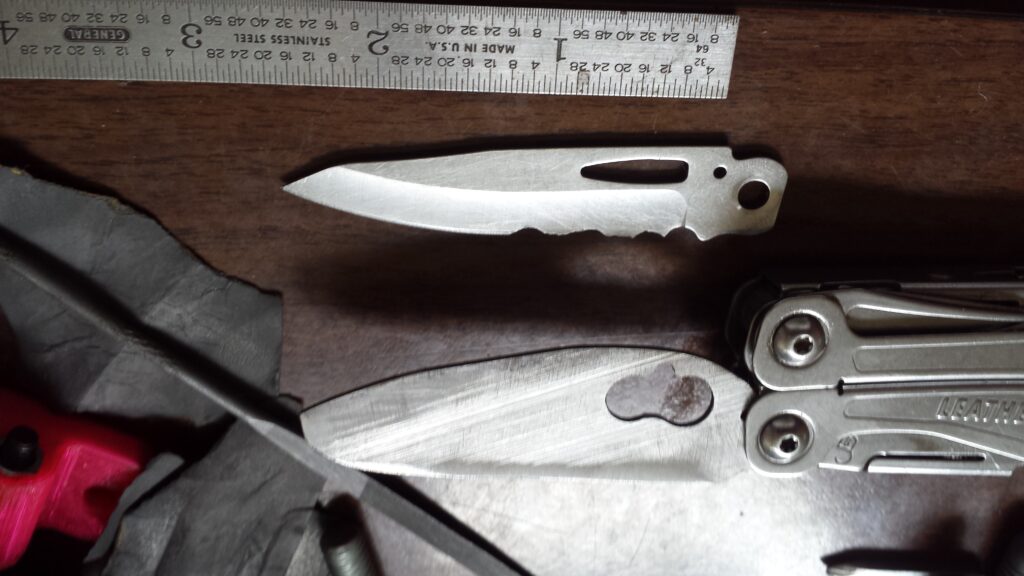
Testing the fit of the new blade. I made it wider, as well as a larger thumbhole. Test fit, obviously blade has yet to be finished/given an edge. Changed the shape of the blade to more of a modified drop point, but the shape is still unfinished.A blurry picture that shows that the leatherman still works in the open position with the wider blade. But just barely.
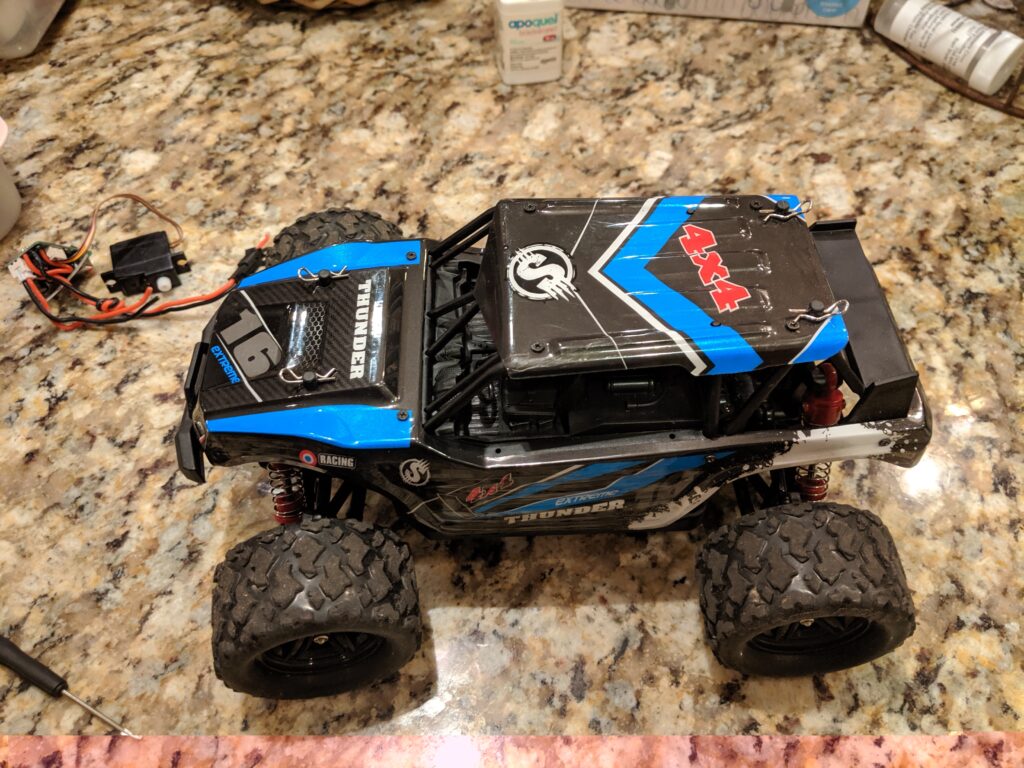
So I’ve always thought that AI racing cars would be a blast to watch. I stumbled upon this website a while back which introduced me to DonkeyCars. And so since I already had a bunch of RC stuff and a few Raspberry Pi’s, I jumped in feet first.
The car itself is pretty quick, and actually quite fun to drive. But as a base on which to create a new DonkeyCar, it’s got a few issues. First of all, it’s has the receiver, ESC (motor controller) and the electronics for the servo in all-in-one package. Great for creating a $40 rc car, bad for hobbyists.
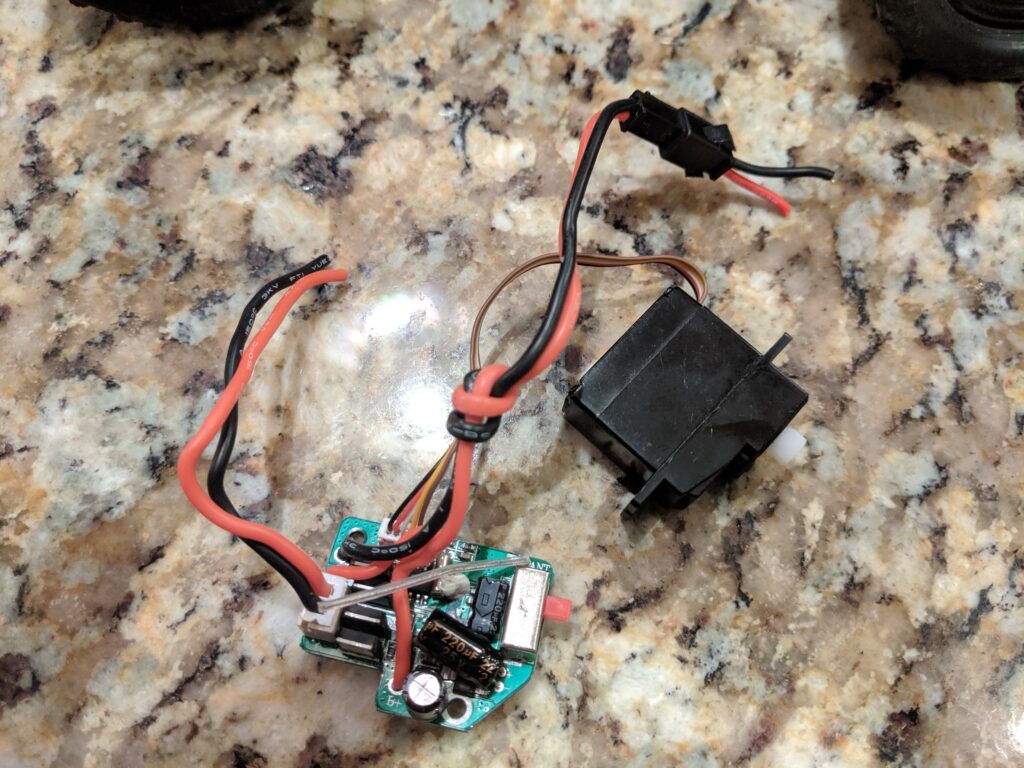
The All-in-One ESC/Receiver/servo electronics along with the 5 wire servo and cut battery/motor wires.
The servo was a 5 wire servo, which I had never even knew existed. Apparently these are “dumb” servos, with all the electronics necessary to run them on the mainboard. So I grabbed a cheap 30amp brushed ESC from ebay, and an emax ES 3103E 17g servo.
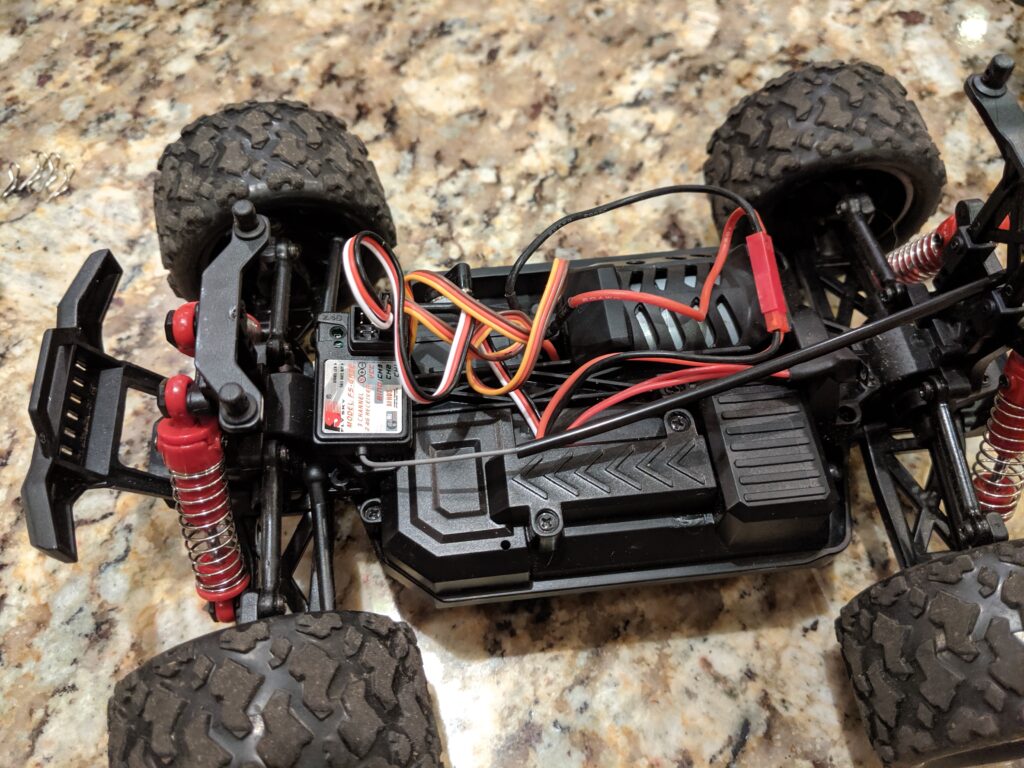
The battery supplied was a 1200 maH 7.4v LiIon battery (two 18650’s) with a non-standard connector (I prefer JST for small batteries/machines, and XT60 for larger capacity or higher amperage uses) I replaced the lead to the battery with a JST, replaced the all-in-one board with the 30a ESC (which fit nicely where the tiny all-in-one board had been. The ES3103E was a direct replacement for the servo holder and the servo saver fit.
Finally, I used the Flysky FS-GT3B transmitter and receiver to hook it all together and it worked fine, while requiring no real changes/mods to the car (I used double sided tape to hold the receiver to the chassis.) This allowed me to test everything without the raspi first, just to make sure the mechanics work. Had to make a slight adjustment to the servo arm, but it worked and I had too much fun driving it.
One of the aspects of this design is that they have molded plastic covers for all of the electronics, even the motor. The Battery compartment can only be accessed from a door on the bottom of the chassis. It’s a nice looking design, and I think it may help to add to the durability of the car, but it makes getting to everything a bit of a pita. Further, the plastic center is attached to the plastic motor cover, which is also the motor holder. This is very subpar for a normal rc car (as it makes it difficult to change the size of motor, as well as providing better motor cooling.) However for our purposes, it’s fine.
But one of the aspects that I really like about this model, is the lack of a one piece canopy. Instead of a truck body, we’ve got a buggy/open cab design. This body has the plastic body with an internal roll cage structure. The seats/steering wheel interior is screwed to the roll cage, and easy to take out which gives us room for a raspberry pi.
Almost a perfect fit for a raspberry pi and case.
I have to make a slightly different case that will allow me to use the 4 screw holes in the roll cage to mount the raspi. But that shouldn’t be too difficult. And with the Pi mounted up near the top of the cab, you still have a decent amount of room to include other electronics and such in the bottom.
I also have to add, that someone has already made a donkeycar chassis adapter for this rc car. You can find it on thingiverse here: Donkey Car Chassis for RC Driver HAT
So next up, actually getting the raspi in there permanently, add the camera, MPU6050 and start getting the DonkeyCar going.
I’ve got a few projects that I would like to start working on. These projects are going to be based on machine learning. To that end, I’m going to be using this blog for links (not just for machine learning, but other interesting pages as well).
I have no idea what I’m doing with machine learning, and I am an absolutely garbage programmer (if I can even call myself a programmer at all. I’m more like a “cut and paste from stackoverflow.”
I’ve always found color case hardening of old pistols and rifles beautiful. And what really made it more interesting to me was the fact that this finish wasn’t just about the looks, but rather was created to add strength to what was once a fairly low quality steel (low carbon content made the steel fairly weak by modern standards, by adding carbon to the outside of the steel, it made the part stronger.) The colors were just an added bonus. So once I had access to a nice furnace and an abundance of 1018 steel, I wanted to learn how to make my own color case hardened steel.
After trolling the internet for useful information (which is a task unto itself.) I came across a nice source on the Marlin Firearms Collectors Association forum. This went into some detail about the traditional way that Marlin Firearms create their amazing (see the above link for great images) color case hardening in the early 1900’s. Further looking through the Practical Machinist and Home Model Engine Machinist forums and separating the fantastic folk wisdom from scientific fact, I came up with what I felt was a good game plan.
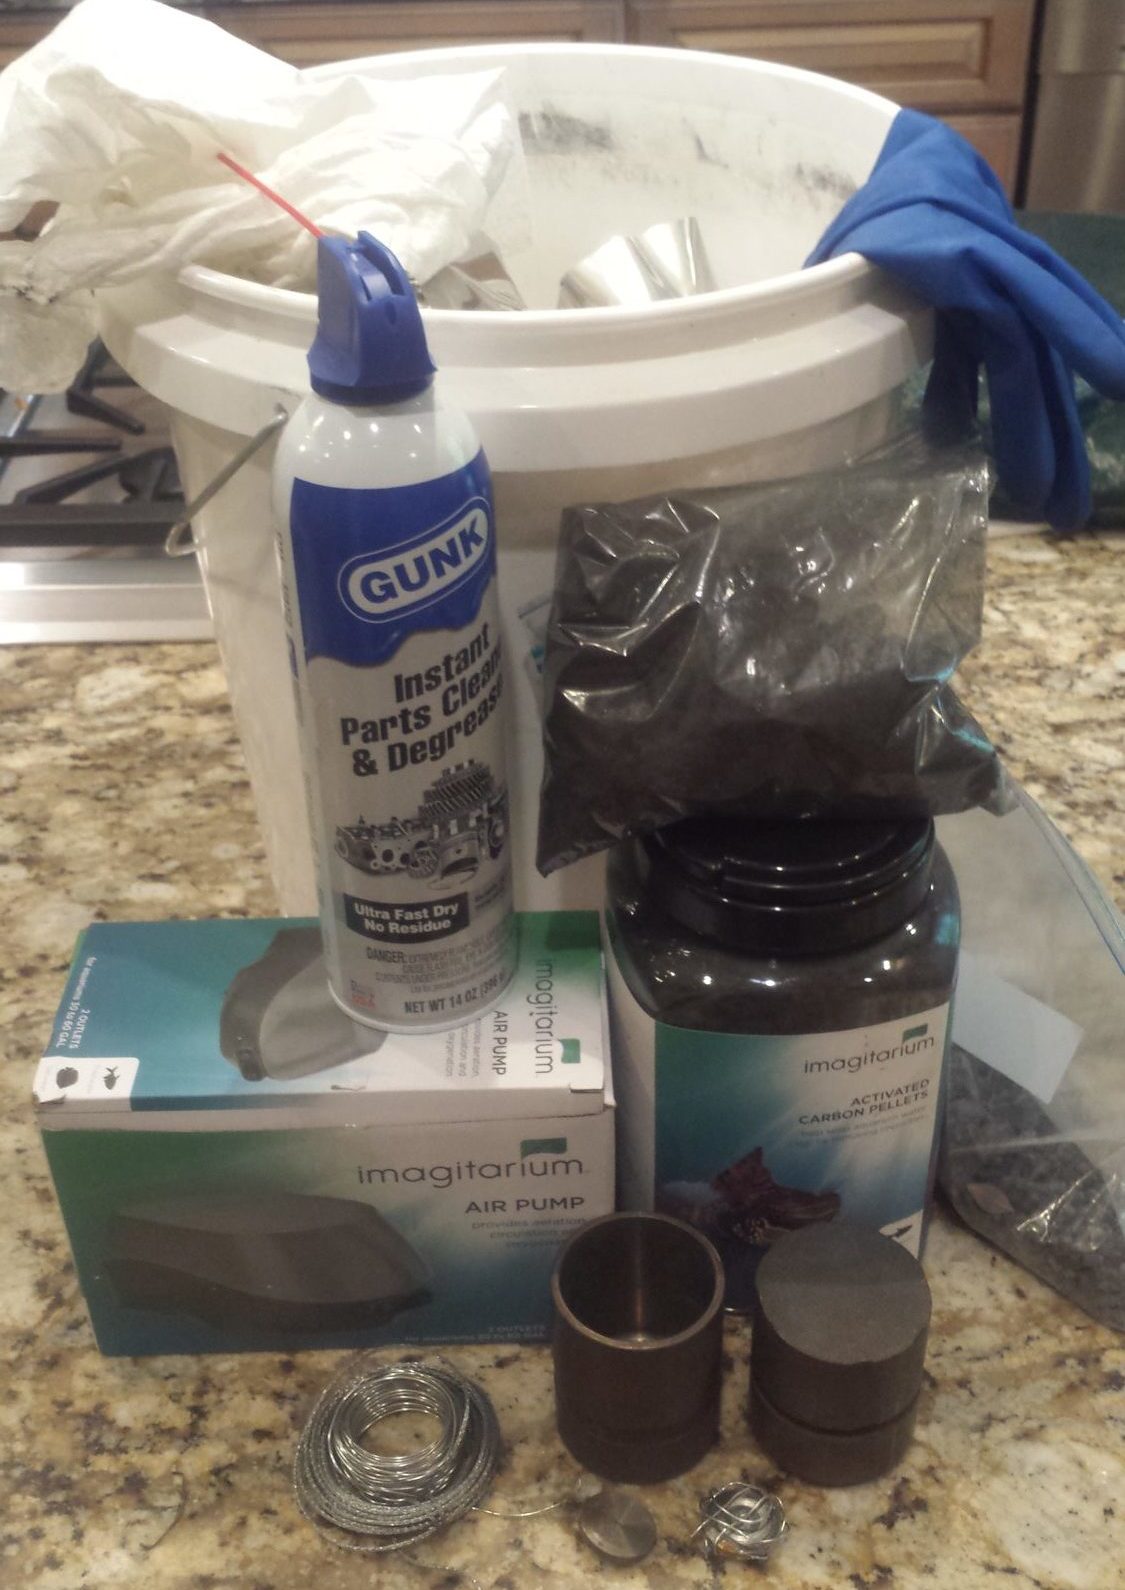
Equipment
Color Case Hardening Equipment
The equipment I used included the following:
Lucifer electric Furnace
Activated Carbon for Aquariums
Hardwood Charcoal (not briquettes, actual real charcoal)
An aquarium air pump
A 5 gallon bucket with tap water
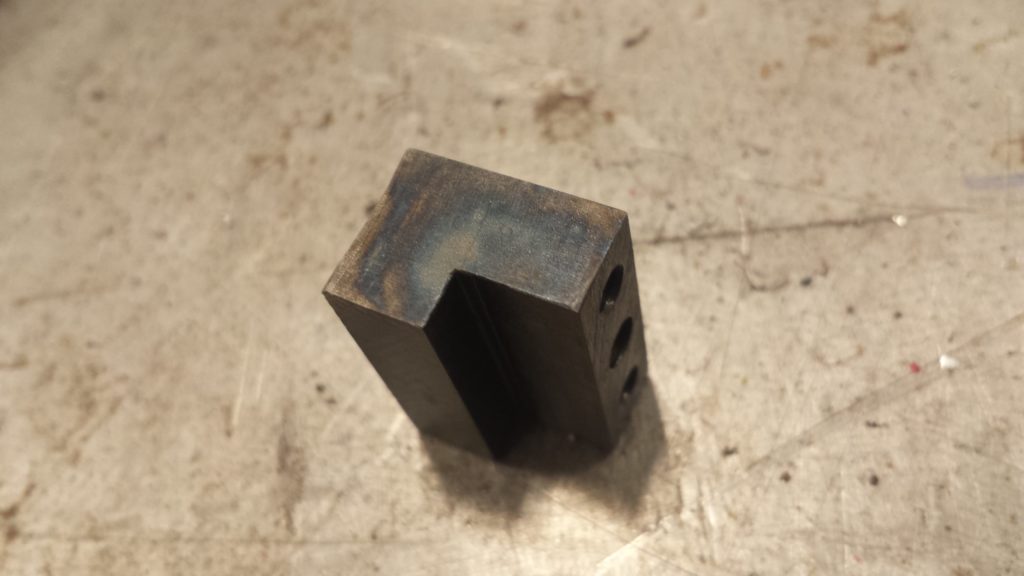
A crucible and lid to hold the charcoal and parts (I used stainless steel) The lid needs to be easily removable with tongs.
degreaser and cleaners for the part you will heat treat
rubber gloves
And equipment for the furnace, such as tongs, safety glasses, nomex gloves, a place to let the parts air cool afterwards, etc.
A second set of hands and a friend is very welcome
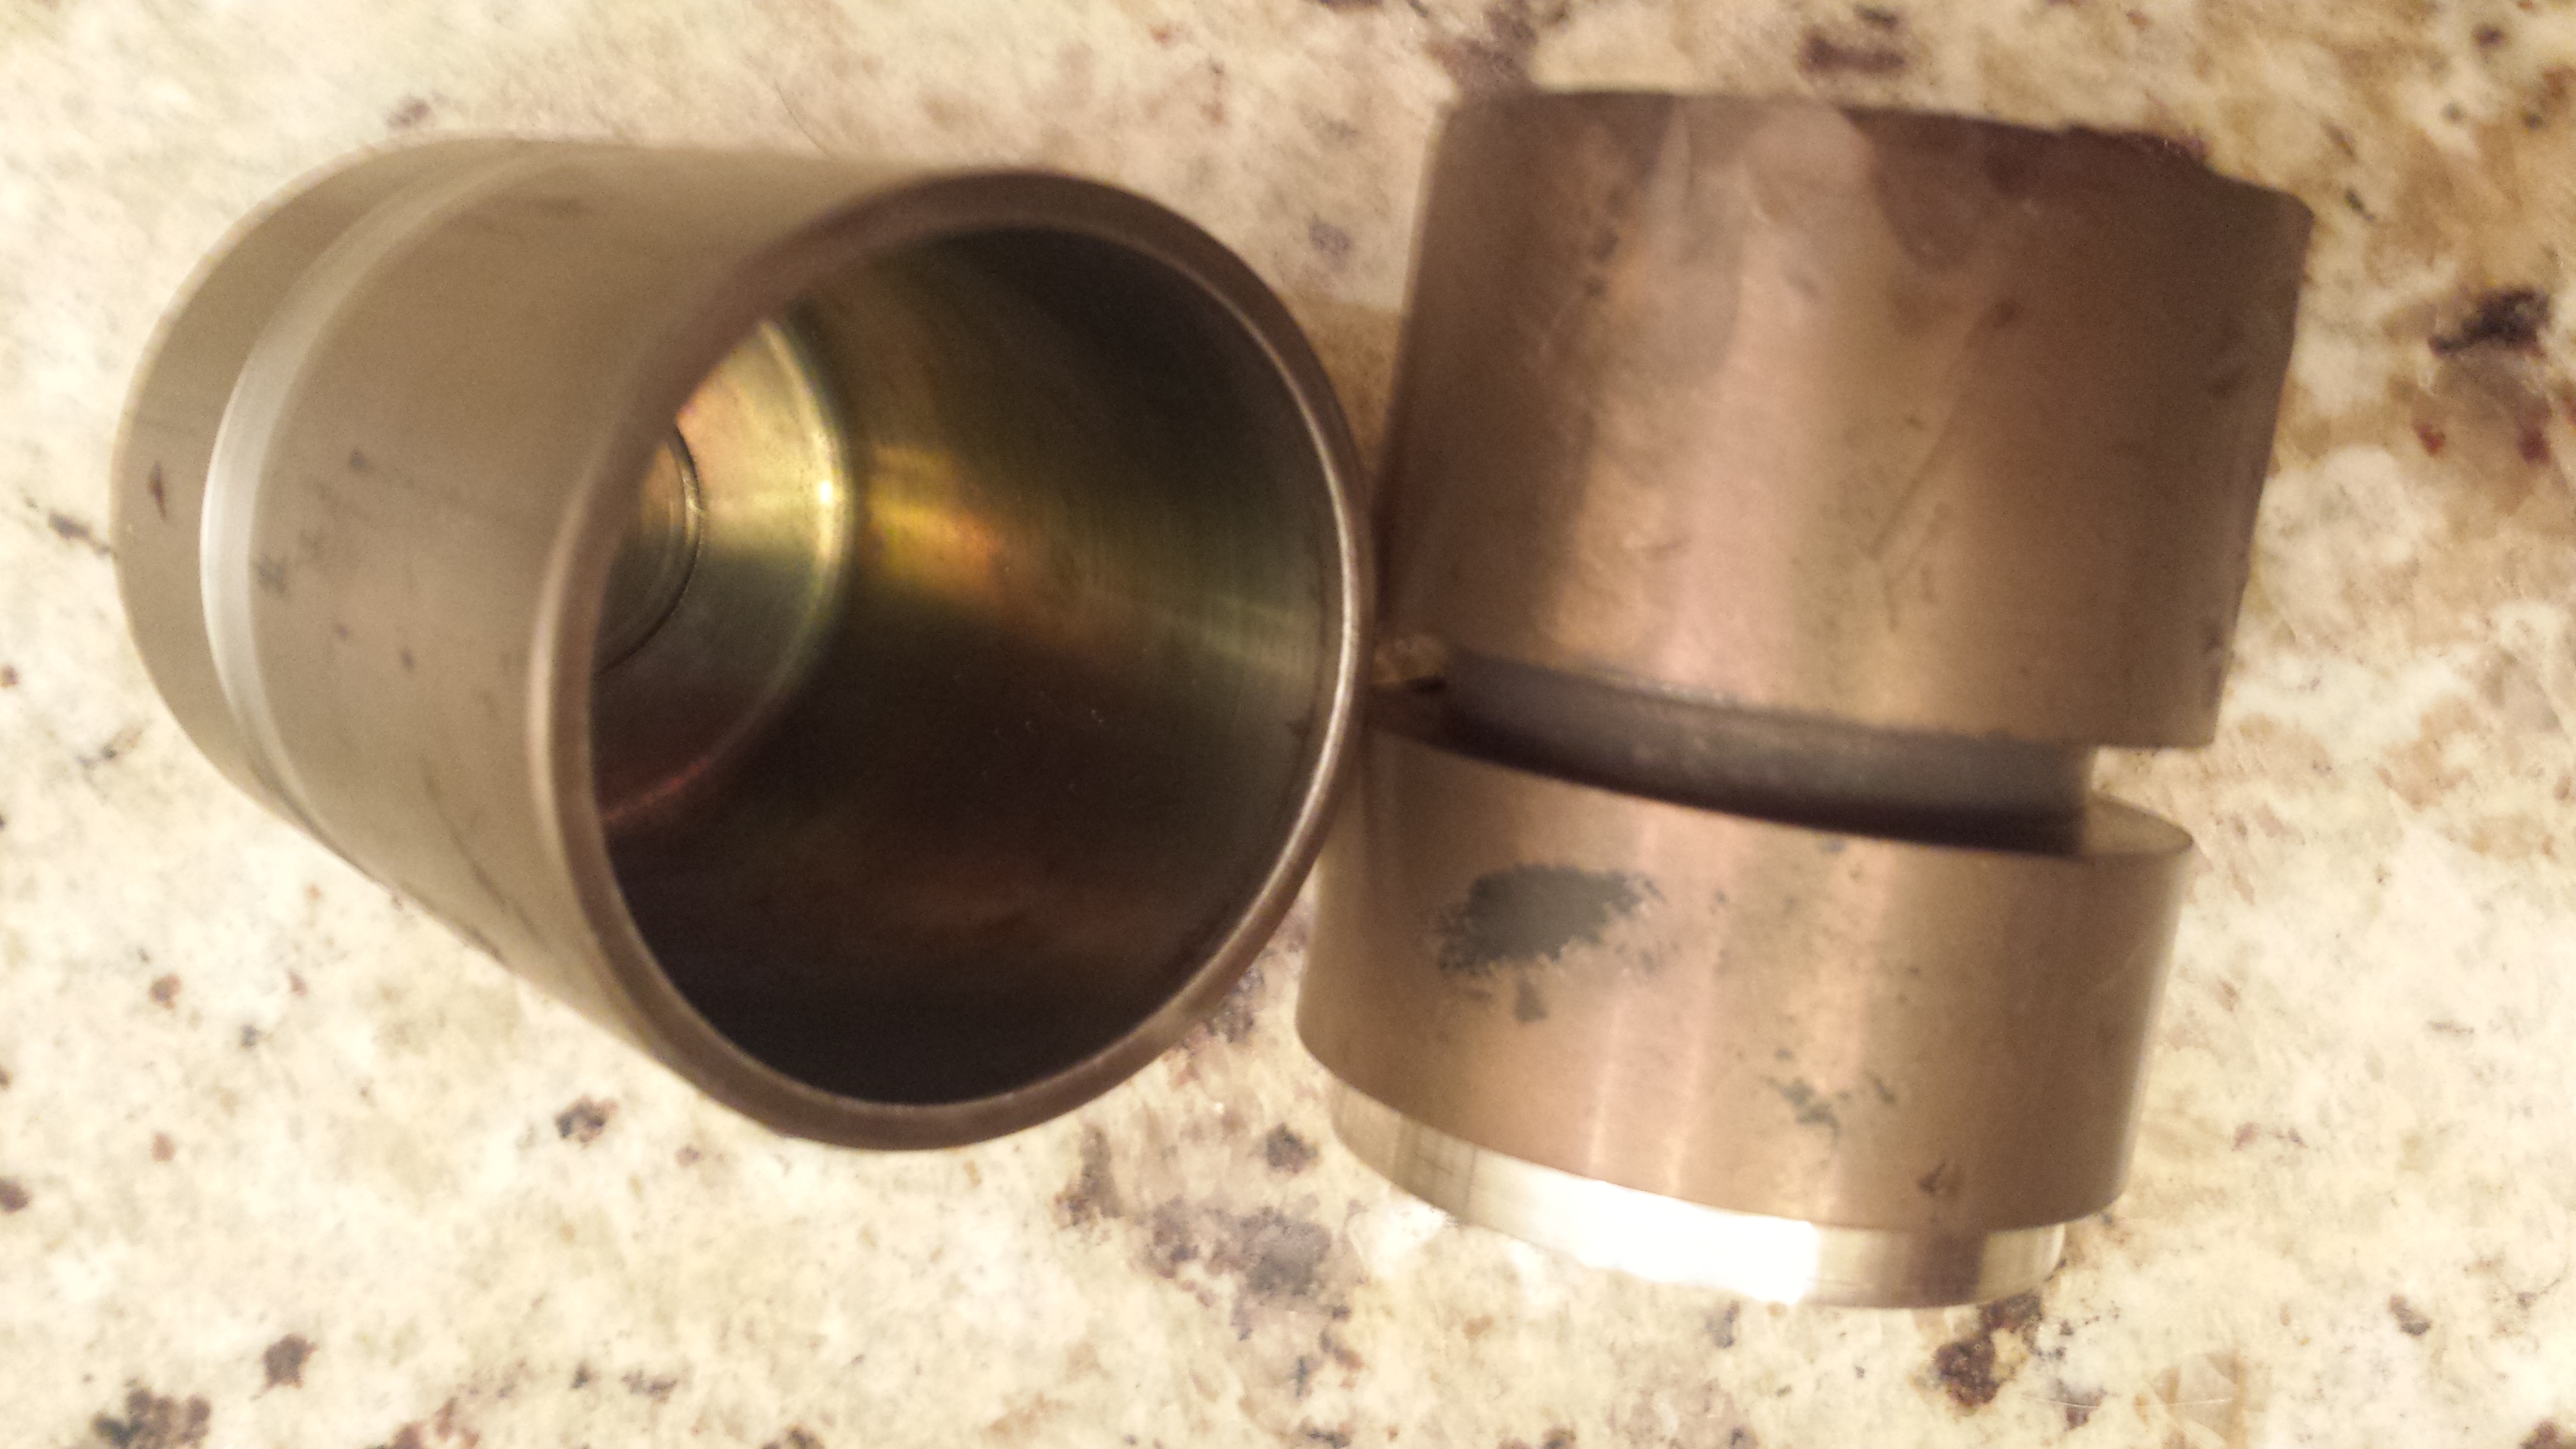
The 304 stainless steel crucible after the first time. Note the green coloring from the heat treatment process.
Method
The method I went with was as simple and cheap as I could make it. I used small pieces of 1018 steel to test the process. Here’s the basic methodology:
Preparation:
I break apart and sieve the wood charcoal to approximate a 1/4″ to 1/2″ diameter.
Experimental – place some activated carbon in a glass of water and add 3 or 4 tum’s antacids (Calcium Carbonate). Let sit for 10-15 minutes then dump on newspaper and allow to dry.
Set your oven to 1600F and allow to warm up. This may take a couple hours depending on your kiln/furnace.
Clean the part with degreaser and then plain water (use gloves to keep your parts clean from hand oils)
Mix the activated carbon and wood charcoal. I use a 1 to 1 mix of carbon/charcoal, trying to get it evenly mixed.
Experimental – wrap the parts loosely with soft steel wire
Pack the parts in the crucible with the charcoal, making sure the part is completely surrounded.
Fill the 5 gallon bucket up with tap water, and place air pump into the water to oxygenate it.
Heat Treat and Quench:
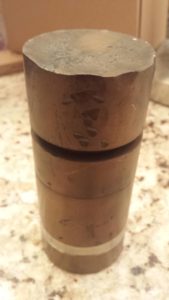
The Red hot Stainless Steel (304) Crucible Lid. You can see the crucible itself to the right after it’s been cooled already. On top of the lid is a small piece of Titanium Grade 5, which we had placed on top to experiment with heat coloring Titanium.
Place the crucible with the lid on it into the furnace.
Let it soak in the kiln for 2 to 8 hours. The longer the time, the deeper the case hardening.
I usually remove the air pump at this time to keep from ruining it with hot steel.
The important part: Once time is up, as quickly as possible, remove the lid and dump the crucible into the bucket as quickly as possible. The speed to this step is key to getting nice colors.
The First Try
The first time I did this was just about a week ago. Being a learning process, things did not go as well as I would have hoped. It worked, but not as well as I would have liked.
I used a mixture of about 1 to 10, wood charcoal to activated carbon (the wood charcoal pieces were large and needed to be sized down), and set the furnace to 1500F.
I used a failed Stainless Steel “mug” a student had made as the crucible and made a really large lid for it out of stainless as well (because it was taking too long to cut off a big part, but this turned out to be a good thing).
A friend (Gunsmoke, who has experience in blacksmithing) helped me take it out of the oven. When we took the crucible out of the oven after 2 hours at 1500F, we couldn’t get the top and bottom to separate.
So my buddy literally had to beat on it with a hammer and pliers to get them to come apart. The whole time I was imploring him not to hurt himself. The last thing I wanted was a burn victim from another one of my bad ideas.
And finally the crucible was beaten apart. This is why it was a good thing to have a huge lid, it gave us a big section to hold on to and hammer. We finally were able to quench it, but it probably took about 10 minutes, whereas to get the best colors you’re supposed to do an immediate quench. I’ve already cut a larger clearance in the crucible lid for the next test.
It’s amazing how much you can move stainless steel when it’s red hot. Note all those hammer marks.
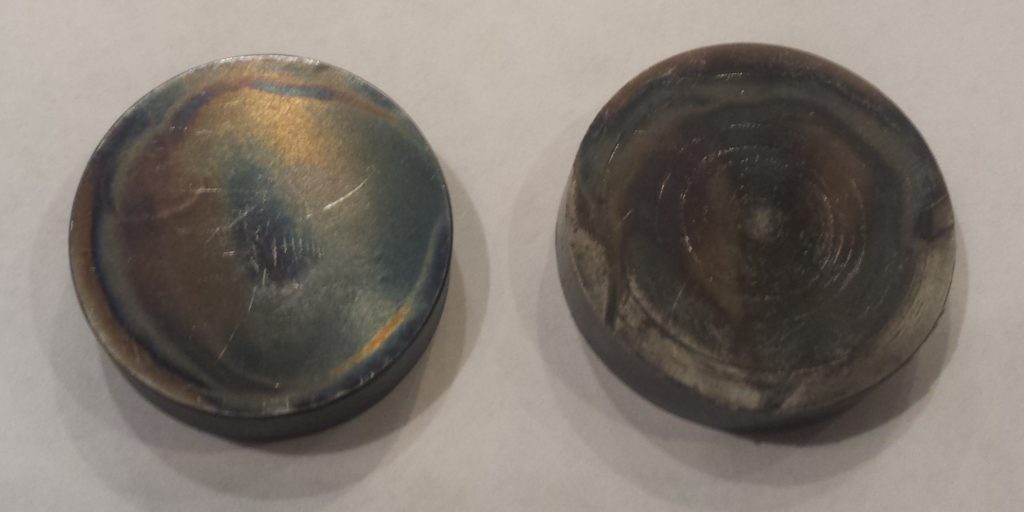
I did get some coloring out of the part, but it also had a small amont of scale distributed around the part, and a large part of the piece was colored a dark brown.
The first color case hardening experiment. A very limited “success.”
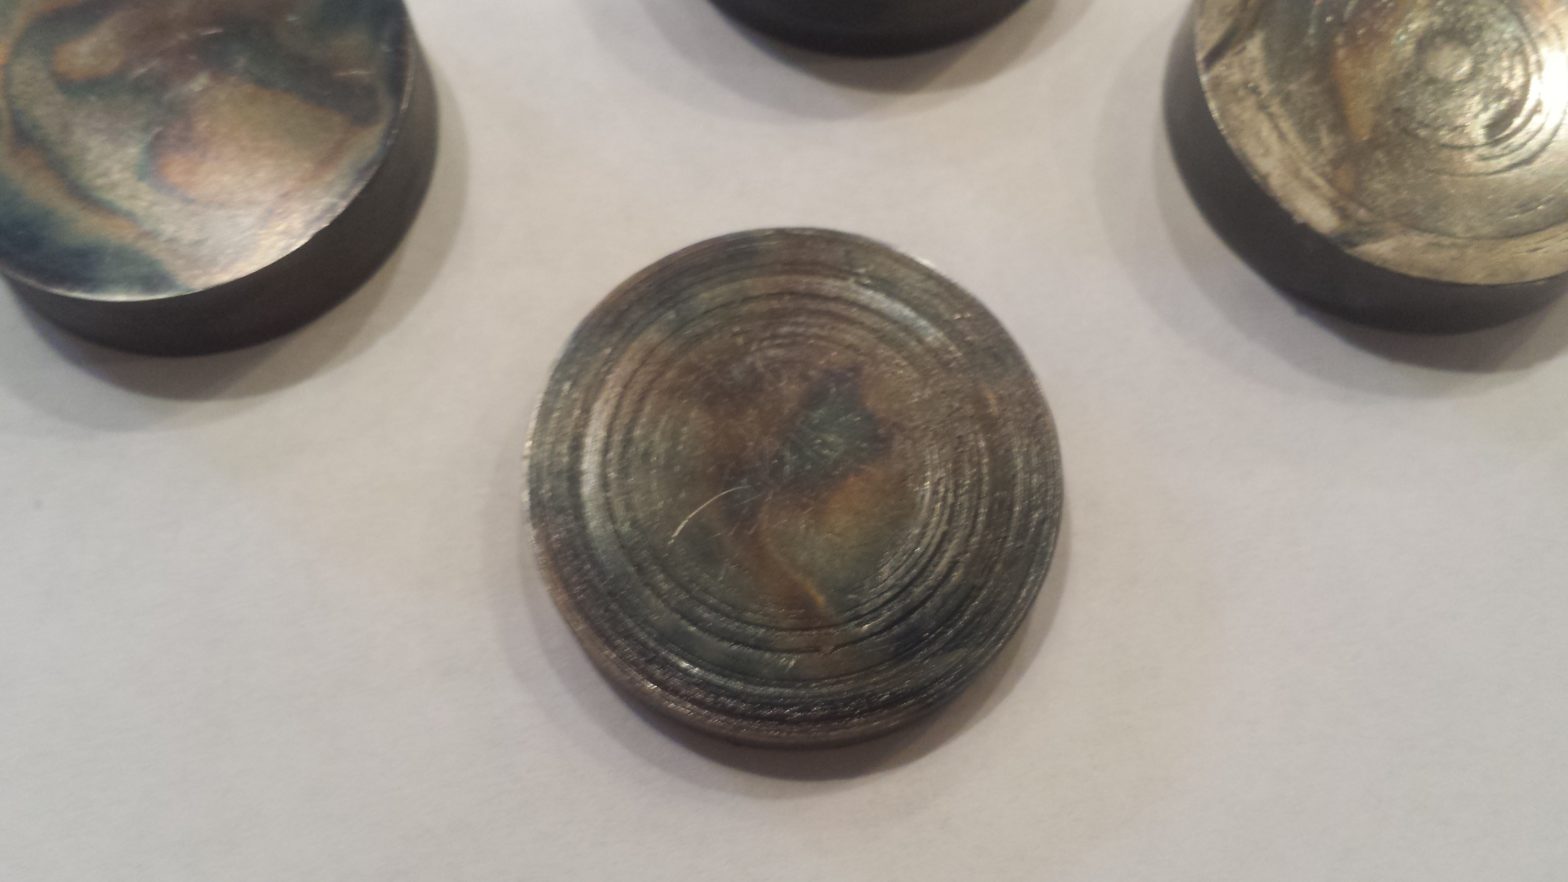
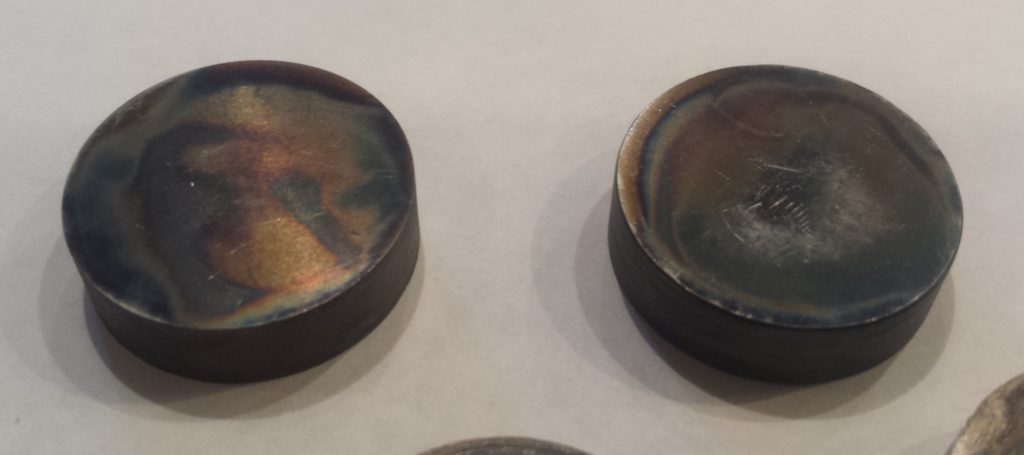
Better Results – Second Try
The results from the second time around. The scratches are from walking around all day with them in my pockets along with some stainless steel and titanium. Because I’m smart like that.
Coming back for the second time, I learned my lesson and made sure that there was at least a 0.030″ clearance around the lid of the crucible. I also increased the temperature to 1600F (which should help with the thickness of the case hardening.)
The sample pieces used for experiment were simple 1″ diameter 1018 steel rounds of various thicknesses (around 1/4″ to 1/2″), sanded to 320 grit (though the very used up lathe left some nasty marks on the pieces, since this was all about testing, I didn’t care much about the surface finish) Two pieces were ground flat.
I also added the “tums” mixture (The calcium carbonate is supposed to help with the uptake of carbon into the steel, as well as help with the coloring, from the little I’ve read on it.)
Further, I both made the wood charcoal pieces smaller and sieved it into various sizes (to help with packing efficiency) and dramatically increased the amount of wood charcoal used (which was helped dramatically with the smaller pieces)
This time around, the lid was removed from the crucible while still in the oven without a problem, and as quickly as humanly possible, the entire crucible was dumped into the aerated water. The results were much more colorful.
I consider this an unqualified success. Now to use this on actual parts.
I believe that the key to this go around was simply being able to immerse the samples into the water as quickly as possible. The wire wrapping and tums, for all intents and purposes may have had some impact, but it’s going to take me some more testing to further to see if they’re another form of old wives tales, or an actually useful method.
Next up, I need to test the actual Rockwell hardness of the parts. I haven’t done that as of yet. Hopefully soon. And then next, real parts. Probably some challenge coins for students. “Congratulations on your first CNC crash!”